Create a policy based VPN connection between Azure Virtual Network Gateway and a Cisco ASA

I recently had to setup a VPN site-to-site connection for a client between Azure and an on-premises environment, where a Cisco ASA 5525 was used.

By default I setup such connections as a route based connection but we could not make this work (the ASA admins didn’t have any experience with connection into the Cloud and especially with Azure).

After opening a ticket with Microsoft, we could see in the logs, that phase 1 and 2 were successful, but the following showed up as well (1.2.3.4 = on-prem public IP, 5.6.7.8 = Azure VPN gateway public IP, 172.16.106.226 = destination host on the on-prem side):

SESSION_ID :{1cc0a60b-d971-4b49-bfac-bace75c44c83} Remote 1.2.3.4:500: Local 5.6.7.8:500: Proposed(send) Traffic Selector payload will be- [Tsid 0x34c  ]Number of TSIs 1: StartAddress 0.0.0.0 EndAddress 255.255.255.255 PortStart 0 PortEnd 65535 Protocol 0 Number of TSRs 1:StartAddress 0.0.0.0 EndAddress 255.255.255.255 PortStart 0 PortEnd 65535 Protocol 0

So the Azure side propagated the complete available address range to route and as the ASA did not answer it followed up to propagate the VNet address range, where its gateway subnet was located in:

SESSION_ID :{e7070311-bf5b-46bb-af4e-1e514ab5fc18} Remote 1.2.3.4:500: Local 5.6.7.8:500: Proposed(send) Traffic Selector payload will be- [Tsid 0x34b  ]Number of TSIs 1: StartAddress 10.221.240.0 EndAddress 10.221.240.255 PortStart 0 PortEnd 65535 Protocol 0 Number of TSRs 1:StartAddress 172.16.106.226 EndAddress 172.16.106.226 PortStart 0 PortEnd 65535 Protocol 0

So we needed to show a way to propagate the right source address range (10.220.8.32/29) on the Azure side. Therefore, we had to update the connection to Use policy based traffic selector and a custom traffic selector to tell the ASA which address ranges we were offering and expecting to connect to.

The final connection configuration looks like this:

Final configuration in Azure portal.

Azure Zertifikate in Azure KeyVault von einem Azure Application Gateway aus aufrufen

Wenn man Zertifikate aus dem Azure KV referenziert, muss die URI der SecretId des Zertifikats *ohne Version* aufgerufen werden.

Also statt

https://kv-einkeyvault.vault.azure.net/secrets/zertifikat/c4e3e45b99ae44998da56b5a38fbXYXY

per

https://kv-einkeyvault.vault.azure.net/secrets/zertifikat/

Hintergrund ist, das die numerische Id die Version darstellt, und es vorkommt, dass diese Version vom AppGw mit gespeichert wird.

Falls das geschehen ist, sollte man das Zertifikat im AppGw (hier per CLI)

  • Löschen:
    az network application-gateway ssl-cert delete --gateway-name "agw-einappgw" -g "resourcegroup-rg" --name "altes-zertifikat"
    und
  • Neu erstellen:
    az network application-gateway ssl-cert create -n "neues-zertifikat" --gateway-name "agw-einappgw" -g "resourcegroup-rg" --key-vault-secret-id "https://kv-einkeyvault.vault.azure.net/secrets/zertifikat/"

Muster für eine kusto Abfrage

Angepasste kusto query um immer gestern von 15:00 – heute 15:00 anzuzeigen.

let yesterday = now(-1d);
let day = datetime_part("Day", yesterday);
let month = datetime_part("Month", yesterday);
let year = datetime_part("Year", yesterday);
let str_yesterday3pm = strcat(year, "-", month, "-", day, " 15:00:00");
let yesterday_3pm = todatetime(str_yesterday3pm);
let str_today3pm = strcat(year, "-", month, "-", datetime_part("Day", now()), " 15:00:00");
let today_3pm = todatetime(str_today3pm);
customMetrics
| where timestamp > yesterday_3pm and timestamp <= today_3pm
| where name == "corona_entry"
| where value > 999
| extend d = parse_json(customDimensions)
| extend program = d.program
| extend postcode = d.postcode
| extend purpose = d.purpose
| extend legal = d.legal
| extend nace = d.nace
| extend size = d.size
| extend age = d.age
| extend duration = d.duration
| extend customMetric_value = iif(itemType == 'customMetric',value,todouble(''))
| project value, timestamp, program, postcode, purpose, legal, nace, size, age, duration

Install Docker on Ubuntu: could not resolve download.docker.com

While installing Docker on a Ubuntu WLS, I experienced some problems where no access to the above FQDN was possible.

This problem occurs, if you network doesn’t support IPv6. In this Case you have to force Ubuntu to use IPv4.

I had to do this in two different steps:

  1. Updating the docker Sources with apt-get update:
    $ apt-get -o Acquire::ForceIPv4=true update -y
  2. Installing the corresponding packages:
    $ apt-get -o Acquire::ForceIPv4=true install docker-ce -y

Problems accessing Azure AD joined Windows 10 VM with RDP

I recently setup a lab environment with a Windows VM in Azure.

I connected with RDP via VPN and as a local admin.

After joining it to a Azure AD I tried to connect with the corresponding Office 365 UPN and credentials but did not succeed.

After hours of investigation and opening a support ticket with Microsoft I found this solution:

  • to connect via mstsc you’ll need to adjust the RDP config file adding the parameter enablecredsspsupport:i:0
  • Now you’re able to connect with RDP via mstac with the O365 user in the form of AzureAD\ (example: AzureAD\someuser@yourdomain.onmicrosoft.com)

If you prefer another RDP client (as I do with Remote Desktop Connection Manager), you’ll have to change a registry setting, as Microsoft changed the RDP defaults in Windows 10. They modified the default for “SecurityLayer” from 0 to 2. Even if you go into the user interface and disable: “Allow connections only from computers running Remote Desktop with Network Level Authentication (recommended)” Still doesn’t change that value to a 2.

  • Open RegEdit
  • Navigate to this Key: HKEY_LOCAL_MACHINE\SYSTEM\CurrentControlSet\Control\Terminal Server\WinStations\RDP-Tcp (Thanks to Renato Brito from Microsoft for this!)
  • Change “SecurityLayer” to a zero
  • Reboot and done!

How to create a fiddler trace for third party support – and remove password(s)

  1. Download and install Fiddler from http://www.getfiddler.com/dl/Fiddler2Setup.exe
  2. Launch Fiddler and click Clear Cache button.
  3. Go to File menu and make sure Capture Traffic is checked.
  4. Go to Tools menu and click Fiddler Options On Https tab check Decrypt Https Traffic and Ignore server certificate errors.
  5. Reproduce the issue and let Fiddler capture and sessions.
  6. Once the issue reproduced then go to Fiddler.
  7. Make sure to remove any passwords:
    1. Select a frame
    2. CTRL+F – search for the password
    3. All highlighted frames must be investigated
    4. Press F2 on a highlighted frame and delete the passwords
  8.  Go to File menu and click Save, choose All Sessions and save the trace as a .saz file

PowerShell Fehler bei CRM Server Setup

Problem:

Wir möchten auf einem bestehenden CRM Server 2015 (RTM 7.0.0) Full Server alle Backend-Rollen (Rollengruppe Backend) entfernen.

Dazu führe ich ein Setup aus und wähle „Configure“, damit ich die Serverrollen bearbeiten kann.

Bei den System Checks kommt dann der Fehler:

The term ‚get-windowsfeature‘ is not recognized as the name of a cmdlet, function, script file, or operable program. Check the spelling of the name, or if a path was included, verify that the path is correct and try again.

Lösung:

Get-WindowsFeature in PS und damit tut CRM Setup wieder!

System properties > Advanced > Environment Variables -> System Variables –> PSModulePath

Problematische VM, PS Module tut net:

C:\Program Files\WindowsPowerShell\Modules;C:\Program Files\Microsoft Monitoring Agent\Agent\PowerShell Neu bereitgestellte VM, PS Module okay:

%SystemRoot%\system32\WindowsPowerShell\v1.0\Modules\;c:\Program Files\Microsoft Security Client\MpProvider Quelle:

https://www.reddit.com/r/PowerShell/comments/3evhw2/i_broke_my_ise_send_help/


Und es geht doch! Azure VMs ohne Automation Account herunterfahren und eine Mail erhalten!

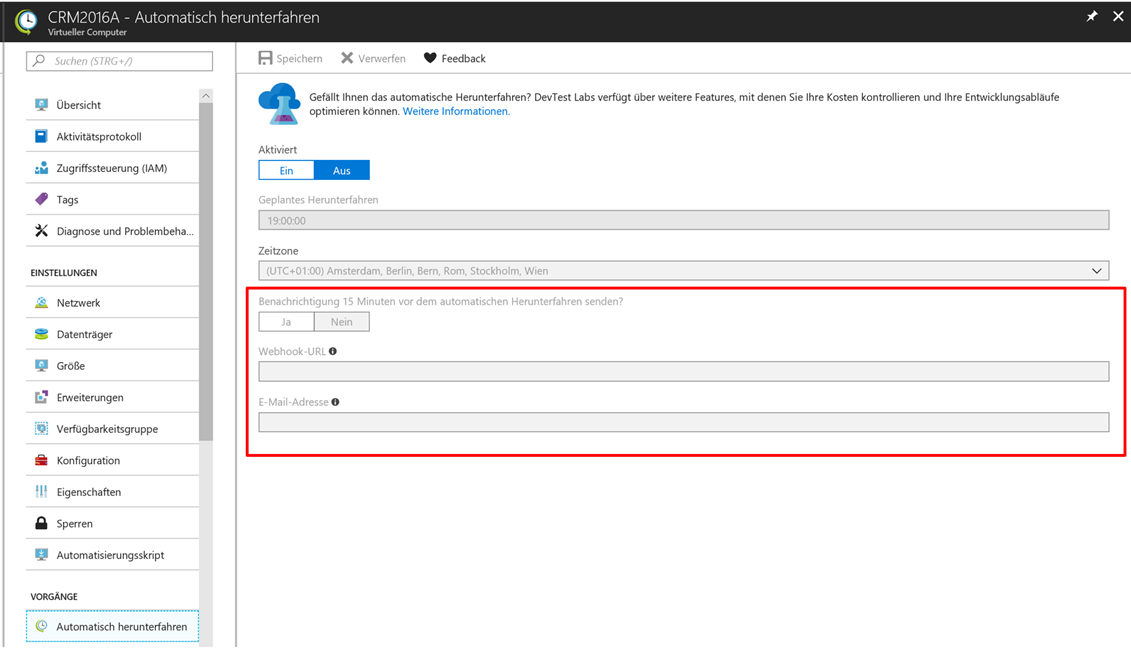
Seit einiger Zeit habe ich einen Case bei Microsoft laufen, weil im Azure Portal unter „Automatisch herunterfahren“ sich plötzlich eine neue Einstellung fand: Benachrichtigung 15 Minuten vor dem automatischen Herunterfahren senden.

Das mit dem Webhook gab es ja schon länger, aber dass man seine E-Mailadresse direkt eingeben kann, war neu. Also gleich ‚mal eine VM angepasst und das vermeintliche Feature ausprobiert.

Allein, es funktionierte nicht!

Also einen Case aufgemacht und von einem Team (Portal) zum nächsten (Automation) zum übernächsten etc. weitergereicht – jeder hatte eine alternative Lösung, alleine das neue (?) Feature funktionierte nicht.

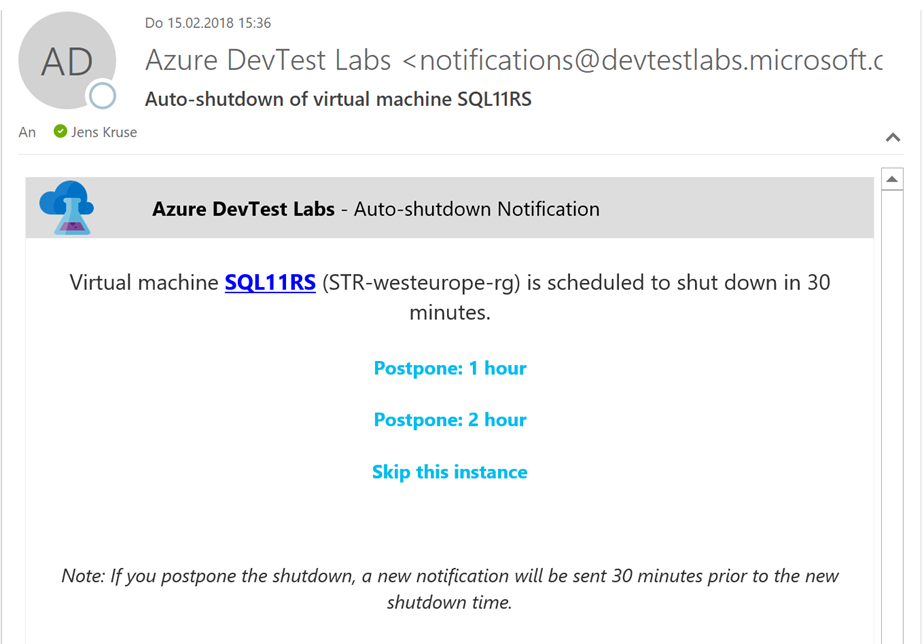
Aber heute hatte ich auf einmal folgende Mail in der Inbox:

Und siehe da: selbst ein Postbone funktioniert!

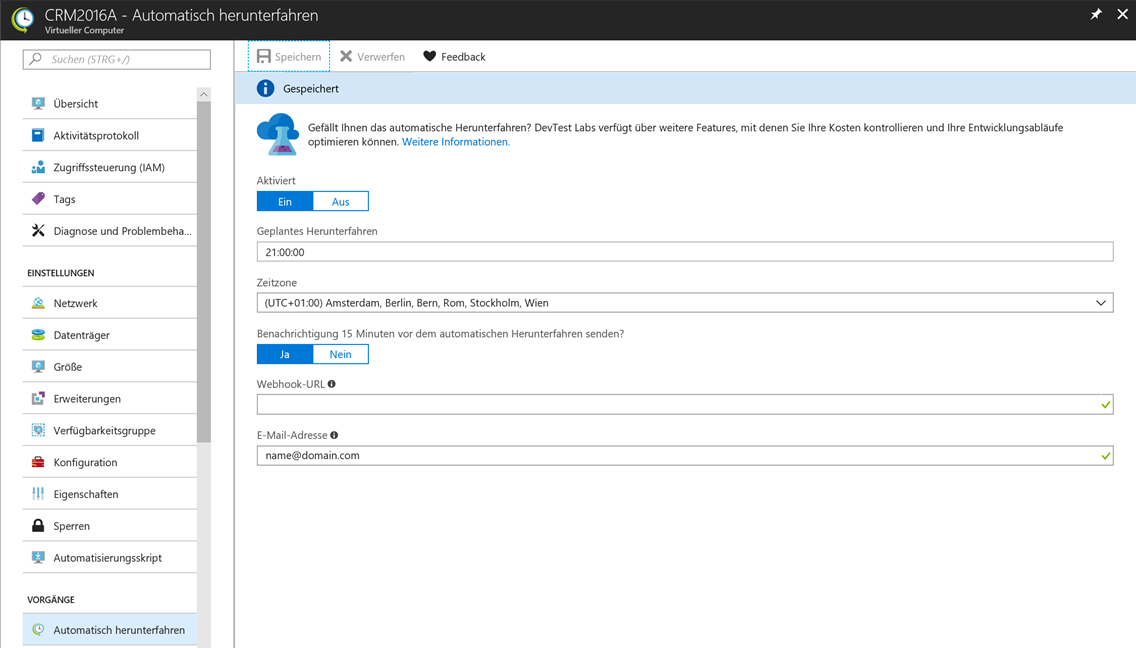
Also ab sofort für die VMs, für die es benötigt wird, den folgenden Eintrag vornehmen (auch wenn die VM nicht über Azure DevTestLabs erstellt wurde ) …

… und man erhält 30 Minuten vor dem Herunterfahren eine entsprechende Mail.

Damit spart man sich diverse Ansätze zum automatisierten Herunterfahren der VMs wie z.B.

  • Runbooks und Automation Accounts
  • Webhooks

Danke, Microsoft – das hilft sehr!